Multitenant System using a table on a database
Introduction
Ontimize allows you to provide the tenants using a table on a database. This is useful when the application will manage a dynamic list of tenants.
Prerequisites
There are 2 options to follow this tutorial, clone the repository with the initial state and follow the tutorial step by step, or download the final example and see which files are new and which have been updated.
Initial project
/$ git clone https://github.com/ontimize/ontimize-examples
/ontimize-examples$ cd ontimize-examples
/ontimize-examples$ git checkout boot-multitenant-by-table-initial
Final example
/$ git clone https://github.com/ontimize/ontimize-examples
/ontimize-examples$ cd ontimize-examples
/ontimize-examples$ git checkout boot-multitenant-by-table
To simplify the code being written, three dots (…) may appear in some parts of the code. This indicates that there may be previous code before and after those dots.
Steps
We will use the existing database for the first tenant, add a new second database for the second tenant and a database to store the tenants table.
Add the script to create the main database and the tenants table
We need a separate database to store a table containing the tenants. This table must provide a column for each tenant property (More information in this link):
templateDB_Main.txt
SET DATABASE UNIQUE NAME HSQLDB687727E49B
SET DATABASE GC 0
SET DATABASE DEFAULT RESULT MEMORY ROWS 0
SET DATABASE EVENT LOG LEVEL 0
SET DATABASE TRANSACTION CONTROL LOCKS
SET DATABASE DEFAULT ISOLATION LEVEL READ COMMITTED
SET DATABASE TRANSACTION ROLLBACK ON CONFLICT TRUE
SET DATABASE TEXT TABLE DEFAULTS ''
SET DATABASE SQL NAMES FALSE
SET DATABASE SQL REFERENCES FALSE
SET DATABASE SQL SIZE TRUE
SET DATABASE SQL TYPES FALSE
SET DATABASE SQL TDC DELETE TRUE
SET DATABASE SQL TDC UPDATE TRUE
SET DATABASE SQL TRANSLATE TTI TYPES TRUE
SET DATABASE SQL TRANSLATE TTI TYPES TRUE
SET DATABASE SQL CONCAT NULLS TRUE
SET DATABASE SQL UNIQUE NULLS TRUE
SET DATABASE SQL CONVERT TRUNCATE TRUE
SET DATABASE SQL AVG SCALE 0
SET DATABASE SQL DOUBLE NAN TRUE
SET FILES WRITE DELAY 500 MILLIS
SET FILES BACKUP INCREMENT TRUE
SET FILES CACHE SIZE 10000
SET FILES CACHE ROWS 50000
SET FILES SCALE 32
SET FILES LOB SCALE 32
SET FILES DEFRAG 0
SET FILES NIO TRUE
SET FILES NIO SIZE 256
SET FILES LOG TRUE
SET FILES LOG SIZE 50
CREATE USER SA PASSWORD DIGEST 'd41d8cd98f00b204e9800998ecf8427e'
ALTER USER SA SET LOCAL TRUE
CREATE SCHEMA PUBLIC AUTHORIZATION DBA
SET SCHEMA PUBLIC
CREATE MEMORY TABLE PUBLIC.TENANTS(TENANT_ID VARCHAR(50) NOT NULL PRIMARY KEY,DRIVER_CLASS VARCHAR(50) NOT NULL,JDBC_URL VARCHAR(100) NOT NULL,USERNAME VARCHAR(50),PASSWORD VARCHAR(50))
SET DATABASE DEFAULT INITIAL SCHEMA PUBLIC
GRANT USAGE ON DOMAIN INFORMATION_SCHEMA.SQL_IDENTIFIER TO PUBLIC
GRANT USAGE ON DOMAIN INFORMATION_SCHEMA.YES_OR_NO TO PUBLIC
GRANT USAGE ON DOMAIN INFORMATION_SCHEMA.TIME_STAMP TO PUBLIC
GRANT USAGE ON DOMAIN INFORMATION_SCHEMA.CARDINAL_NUMBER TO PUBLIC
GRANT USAGE ON DOMAIN INFORMATION_SCHEMA.CHARACTER_DATA TO PUBLIC
GRANT DBA TO SA
SET SCHEMA SYSTEM_LOBS
INSERT INTO BLOCKS VALUES(0,2147483647,0)
SET SCHEMA PUBLIC- ontimize-examples
- projectwiki-api
- src
- main
- java
- com
- ontimize
- projectwiki
- api
- core
- service
- IUserService.java
- service
- core
- api
- projectwiki
- ontimize
- com
- java
- main
- pom.xml
- src
- projectwiki-boot
- src
- main
- java
- com
- ontimize
- projectwiki
- ServerApplication.java
- projectwiki
- ontimize
- com
- resources
- public
- index.html
- application.yml
- public
- java
- main
- pom.xml
- src
- projectwiki-model
- src
- main
- db
- templateDB.txt
- templateDB_Main.txt
- java
- com
- ontimize
- projectwiki
- model
- core
- dao
- UserDao.java
- UserRoleDao.java
- service
- UserService.java
- dao
- core
- model
- projectwiki
- ontimize
- com
- resources
- dao
- placeholders.properties
- UserDao.xml
- UserRoleDao.xml
- dao
- db
- main
- pom.xml
- src
- projectwiki-openapi
- src
- main
- ontimize
- marker-ws-ontimize-openapi-generator
- resources
- public
- restapi
- api
- Test.yml
- User.yml
- base
- AdvancedEntityResult.yml
- AdvancedQueryParameter.yml
- ColumnsParameter.yml
- DeleteParameter.yml
- DocumentIdentifier.yml
- EntityResult.yml
- ExportParameter.yml
- FileListParameter.yml
- FilterParameter.yml
- InsertParameter.yml
- MultipartFile.yml
- MultipartFiles.yml
- Number.yml
- Object.yml
- OFile.yml
- OFiles.yml
- Operator.yml
- QueryParameter.yml
- Responses.yml
- SQLOrder.yml
- String.yml
- UpdateFileParameter.yml
- UpdateParameter.yml
- Void.yml
- openapi-rest.yml
- api
- restapi
- public
- ontimize
- main
- pom.xml
- src
- projectwiki-ws
- src
- main
- java
- com
- ontimize
- projectwiki
- ws
- core
- rest
- MainRestController.java
- TestRestController.java
- UserRestController.java
- rest
- core
- ws
- projectwiki
- ontimize
- com
- java
- main
- pom.xml
- src
- .gitignore
- pom.xml
- README.md
- projectwiki-api
Deploy the main database and the tenants
In the pom.xml of the model module, we need to replace the old configuration with the below to deploy the new databases:
pom.xml
...
  <profiles>
    ...
    <profile>
      <id>run_database</id>
      ...
      <build>
        <plugins>
          ...
          <plugin>
            <groupId>org.apache.maven.plugins</groupId>
            <artifactId>maven-antrun-plugin</artifactId>
            ...
            <executions>
              <execution>
                <id>configure_database</id>
                ...
                <configuration>
                  <target>
                    <available file="${hsqldatabase.path}/templateDB_Main.script" property="database.exist" />
                    <echo message="${hsqldatabase.path}/templateDB_Main.script" />
                    <copy tofile="${hsqldatabase.path}/templateDB_Main.script" file="${hsqldatabase.path}/templateDB_Main.txt" />

                    <available file="${hsqldatabase.path}/templateDB1.script" property="database.exist" />
                    <echo message="${hsqldatabase.path}/templateDB1.script" />
                    <copy tofile="${hsqldatabase.path}/templateDB1.script" file="${hsqldatabase.path}/templateDB.txt" />

                    <available file="${hsqldatabase.path}/templateDB2.script" property="database.exist" />
                    <echo message="${hsqldatabase.path}/templateDB2.script" />
                    <copy tofile="${hsqldatabase.path}/templateDB2.script" file="${hsqldatabase.path}/templateDB.txt" />
                  </target>
                </configuration>
              </execution>
            </executions>
          </plugin>
          <plugin>
            <groupId>org.codehaus.mojo</groupId>
            <artifactId>exec-maven-plugin</artifactId>
            ...
            <configuration>
              <arguments>
                <argument>-port</argument>
                <argument>9013</argument>

                <argument>-database.0</argument>
                <argument>${hsqldatabase.path}/templateDB_Main</argument>
                <argument>-dbname.0</argument>
                <argument>templateDB_Main</argument>

                <argument>-database.1</argument>
                <argument>${hsqldatabase.path}/templateDB1</argument>
                <argument>-dbname.1</argument>
                <argument>templateDB1</argument>

                <argument>-database.2</argument>
                <argument>${hsqldatabase.path}/templateDB2</argument>
                <argument>-dbname.2</argument>
                <argument>templateDB2</argument>
              </arguments>
            </configuration>
          </plugin>
        </plugins>
      </build>
    </profile>
    ...
  </profiles>
...- ontimize-examples
- projectwiki-api
- src
- main
- java
- com
- ontimize
- projectwiki
- api
- core
- service
- IUserService.java
- service
- core
- api
- projectwiki
- ontimize
- com
- java
- main
- pom.xml
- src
- projectwiki-boot
- src
- main
- java
- com
- ontimize
- projectwiki
- ServerApplication.java
- projectwiki
- ontimize
- com
- resources
- public
- index.html
- application.yml
- public
- java
- main
- pom.xml
- src
- projectwiki-model
- src
- main
- db
- templateDB.txt
- templateDB_Main.txt
- java
- com
- ontimize
- projectwiki
- model
- core
- dao
- UserDao.java
- UserRoleDao.java
- service
- UserService.java
- dao
- core
- model
- projectwiki
- ontimize
- com
- resources
- dao
- placeholders.properties
- UserDao.xml
- UserRoleDao.xml
- dao
- db
- main
- pom.xml
- src
- projectwiki-openapi
- src
- main
- ontimize
- marker-ws-ontimize-openapi-generator
- resources
- public
- restapi
- api
- Test.yml
- User.yml
- base
- AdvancedEntityResult.yml
- AdvancedQueryParameter.yml
- ColumnsParameter.yml
- DeleteParameter.yml
- DocumentIdentifier.yml
- EntityResult.yml
- ExportParameter.yml
- FileListParameter.yml
- FilterParameter.yml
- InsertParameter.yml
- MultipartFile.yml
- MultipartFiles.yml
- Number.yml
- Object.yml
- OFile.yml
- OFiles.yml
- Operator.yml
- QueryParameter.yml
- Responses.yml
- SQLOrder.yml
- String.yml
- UpdateFileParameter.yml
- UpdateParameter.yml
- Void.yml
- openapi-rest.yml
- api
- restapi
- public
- ontimize
- main
- pom.xml
- src
- projectwiki-ws
- src
- main
- java
- com
- ontimize
- projectwiki
- ws
- core
- rest
- MainRestController.java
- TestRestController.java
- UserRestController.java
- rest
- core
- ws
- projectwiki
- ontimize
- com
- java
- main
- pom.xml
- src
- .gitignore
- pom.xml
- README.md
- projectwiki-api
Add the data access object for the tenants table
TenantDao.java
package com.ontimize.projectwiki.model.core.dao;

import com.ontimize.jee.server.dao.jdbc.OntimizeJdbcDaoSupport;
import org.springframework.context.annotation.Lazy;
import org.springframework.stereotype.Repository;

import com.ontimize.jee.server.dao.common.ConfigurationFile;

@Lazy
@Repository(value = "TenantDao")
@ConfigurationFile(
        configurationFile = "dao/TenantDao.xml",
        configurationFilePlaceholder = "dao/placeholders.properties")
public class TenantDao extends OntimizeJdbcDaoSupport {
	public static final String ID = "tenant_id";
	public static final String DRIVER_CLASS = "driver_class";
	public static final String JDBC_URL = "jdbc_url";
	public static final String USERNAME = "username";
	public static final String PASSWORD = "password";
}
TenantDao.xml
<?xml version="1.0" encoding="UTF-8"?>
<JdbcEntitySetup
    xmlns="http://www.ontimize.com/schema/jdbc"
    xmlns:xsi="http://www.w3.org/2001/XMLSchema-instance"
    xsi:schemaLocation="http://www.ontimize.com/schema/jdbc http://www.ontimize.com/schema/jdbc/ontimize-jdbc-dao.xsd"
    catalog="" schema="${mainschema}" table="tenants"
    datasource="mainDataSource" sqlhandler="dbSQLStatementHandler">
    <DeleteKeys>
        <Column>tenant_id</Column>
    </DeleteKeys>
    <UpdateKeys>
        <Column>tenant_id</Column>
    </UpdateKeys>
    <Queries>
        <Query id="default">
            <Sentence>
                <![CDATA[
                    SELECT #COLUMNS#
                    FROM
                        ${mainschema}.tenants
                    #WHERE#
                ]]>
            </Sentence>
        </Query>
    </Queries>
</JdbcEntitySetup>- ontimize-examples
- projectwiki-api
- src
- main
- java
- com
- ontimize
- projectwiki
- api
- core
- service
- IUserService.java
- service
- core
- api
- projectwiki
- ontimize
- com
- java
- main
- pom.xml
- src
- projectwiki-boot
- src
- main
- java
- com
- ontimize
- projectwiki
- ServerApplication.java
- projectwiki
- ontimize
- com
- resources
- public
- index.html
- application.yml
- public
- java
- main
- pom.xml
- src
- projectwiki-model
- src
- main
- db
- templateDB.txt
- templateDB_Main.txt
- java
- com
- ontimize
- projectwiki
- model
- core
- dao
- TenantDao.java
- UserDao.java
- UserRoleDao.java
- service
- UserService.java
- dao
- core
- model
- projectwiki
- ontimize
- com
- resources
- dao
- placeholders.properties
- TenantDao.xml
- UserDao.xml
- UserRoleDao.xml
- dao
- db
- main
- pom.xml
- src
- projectwiki-openapi
- src
- main
- ontimize
- marker-ws-ontimize-openapi-generator
- resources
- public
- restapi
- api
- Test.yml
- User.yml
- base
- AdvancedEntityResult.yml
- AdvancedQueryParameter.yml
- ColumnsParameter.yml
- DeleteParameter.yml
- DocumentIdentifier.yml
- EntityResult.yml
- ExportParameter.yml
- FileListParameter.yml
- FilterParameter.yml
- InsertParameter.yml
- MultipartFile.yml
- MultipartFiles.yml
- Number.yml
- Object.yml
- OFile.yml
- OFiles.yml
- Operator.yml
- QueryParameter.yml
- Responses.yml
- SQLOrder.yml
- String.yml
- UpdateFileParameter.yml
- UpdateParameter.yml
- Void.yml
- openapi-rest.yml
- api
- restapi
- public
- ontimize
- main
- pom.xml
- src
- projectwiki-ws
- src
- main
- java
- com
- ontimize
- projectwiki
- ws
- core
- rest
- MainRestController.java
- TestRestController.java
- UserRestController.java
- rest
- core
- ws
- projectwiki
- ontimize
- com
- java
- main
- pom.xml
- src
- .gitignore
- pom.xml
- README.md
- projectwiki-api
Enable the multitenant system
In the application.yml we need to enable the multitenant system and add the settings for the tenant repository (More information in this link):
application.yml
ontimize:
   ...
   multitenant:
      enabled: true
      configuration:
         tenant-repository: TenantDao
         query-id: default
         tenant-id-column: TENANT_ID
         driver-class-column: DRIVER_CLASS
         jdbc-url-column: JDBC_URL
         username-column: USERNAME
         password-column: PASSWORD
...
spring:
  ...
  datasource:
    driver-class-name: org.hsqldb.jdbcDriver
    jdbc-url: jdbc:hsqldb:hsql://localhost:9013/templateDB_Main
    username: SA
    password:
    initial-size: 10
    test-on-borrow: true
...- ontimize-examples
- projectwiki-api
- src
- main
- java
- com
- ontimize
- projectwiki
- api
- core
- service
- IUserService.java
- service
- core
- api
- projectwiki
- ontimize
- com
- java
- main
- pom.xml
- src
- projectwiki-boot
- src
- main
- java
- com
- ontimize
- projectwiki
- ServerApplication.java
- projectwiki
- ontimize
- com
- resources
- public
- index.html
- application.yml
- public
- java
- main
- pom.xml
- src
- projectwiki-model
- src
- main
- db
- templateDB.txt
- templateDB_Main.txt
- java
- com
- ontimize
- projectwiki
- model
- core
- dao
- TenantDao.java
- UserDao.java
- UserRoleDao.java
- service
- UserService.java
- dao
- core
- model
- projectwiki
- ontimize
- com
- resources
- dao
- placeholders.properties
- TenantDao.xml
- UserDao.xml
- UserRoleDao.xml
- dao
- db
- main
- pom.xml
- src
- projectwiki-openapi
- src
- main
- ontimize
- marker-ws-ontimize-openapi-generator
- resources
- public
- restapi
- api
- Test.yml
- User.yml
- base
- AdvancedEntityResult.yml
- AdvancedQueryParameter.yml
- ColumnsParameter.yml
- DeleteParameter.yml
- DocumentIdentifier.yml
- EntityResult.yml
- ExportParameter.yml
- FileListParameter.yml
- FilterParameter.yml
- InsertParameter.yml
- MultipartFile.yml
- MultipartFiles.yml
- Number.yml
- Object.yml
- OFile.yml
- OFiles.yml
- Operator.yml
- QueryParameter.yml
- Responses.yml
- SQLOrder.yml
- String.yml
- UpdateFileParameter.yml
- UpdateParameter.yml
- Void.yml
- openapi-rest.yml
- api
- restapi
- public
- ontimize
- main
- pom.xml
- src
- projectwiki-ws
- src
- main
- java
- com
- ontimize
- projectwiki
- ws
- core
- rest
- MainRestController.java
- TestRestController.java
- UserRestController.java
- rest
- core
- ws
- projectwiki
- ontimize
- com
- java
- main
- pom.xml
- src
- .gitignore
- pom.xml
- README.md
- projectwiki-api
Configure the tenants properties on the tenants table
templateDB_Main.txt
...
INSERT INTO TENANTS VALUES('tenant1','org.hsqldb.jdbcDriver','jdbc:hsqldb:hsql://localhost:9013/templateDB1','SA',NULL)
INSERT INTO TENANTS VALUES('tenant2','org.hsqldb.jdbcDriver','jdbc:hsqldb:hsql://localhost:9013/templateDB2','SA',NULL)- ontimize-examples
- projectwiki-api
- src
- main
- java
- com
- ontimize
- projectwiki
- api
- core
- service
- IUserService.java
- service
- core
- api
- projectwiki
- ontimize
- com
- java
- main
- pom.xml
- src
- projectwiki-boot
- src
- main
- java
- com
- ontimize
- projectwiki
- ServerApplication.java
- projectwiki
- ontimize
- com
- resources
- public
- index.html
- application.yml
- public
- java
- main
- pom.xml
- src
- projectwiki-model
- src
- main
- db
- templateDB.txt
- templateDB_Main.txt
- java
- com
- ontimize
- projectwiki
- model
- core
- dao
- TenantDao.java
- UserDao.java
- UserRoleDao.java
- service
- UserService.java
- dao
- core
- model
- projectwiki
- ontimize
- com
- resources
- dao
- placeholders.properties
- TenantDao.xml
- UserDao.xml
- UserRoleDao.xml
- dao
- db
- main
- pom.xml
- src
- projectwiki-openapi
- src
- main
- ontimize
- marker-ws-ontimize-openapi-generator
- resources
- public
- restapi
- api
- Test.yml
- User.yml
- base
- AdvancedEntityResult.yml
- AdvancedQueryParameter.yml
- ColumnsParameter.yml
- DeleteParameter.yml
- DocumentIdentifier.yml
- EntityResult.yml
- ExportParameter.yml
- FileListParameter.yml
- FilterParameter.yml
- InsertParameter.yml
- MultipartFile.yml
- MultipartFiles.yml
- Number.yml
- Object.yml
- OFile.yml
- OFiles.yml
- Operator.yml
- QueryParameter.yml
- Responses.yml
- SQLOrder.yml
- String.yml
- UpdateFileParameter.yml
- UpdateParameter.yml
- Void.yml
- openapi-rest.yml
- api
- restapi
- public
- ontimize
- main
- pom.xml
- src
- projectwiki-ws
- src
- main
- java
- com
- ontimize
- projectwiki
- ws
- core
- rest
- MainRestController.java
- TestRestController.java
- UserRestController.java
- rest
- core
- ws
- projectwiki
- ontimize
- com
- java
- main
- pom.xml
- src
- .gitignore
- pom.xml
- README.md
- projectwiki-api
Update the data access objects
The multitenant system provides its own datasource and the DAOs must use it, so we need set the datasource property to tenantDatasource.
The tenants table is stored on the main database, you should not modify the TenantDao.xml file.
UserDao.xml and RoleDao.xml
<?xml version="1.0" encoding="UTF-8"?>
<JdbcEntitySetup
    ...
    datasource="tenantDataSource"
...- ontimize-examples
- projectwiki-api
- src
- main
- java
- com
- ontimize
- projectwiki
- api
- core
- service
- IUserService.java
- service
- core
- api
- projectwiki
- ontimize
- com
- java
- main
- pom.xml
- src
- projectwiki-boot
- src
- main
- java
- com
- ontimize
- projectwiki
- ServerApplication.java
- projectwiki
- ontimize
- com
- resources
- public
- index.html
- application.yml
- public
- java
- main
- pom.xml
- src
- projectwiki-model
- src
- main
- db
- templateDB.txt
- templateDB_Main.txt
- java
- com
- ontimize
- projectwiki
- model
- core
- dao
- TenantDao.java
- UserDao.java
- UserRoleDao.java
- service
- UserService.java
- dao
- core
- model
- projectwiki
- ontimize
- com
- resources
- dao
- placeholders.properties
- TenantDao.xml
- UserDao.xml
- UserRoleDao.xml
- dao
- db
- main
- pom.xml
- src
- projectwiki-openapi
- src
- main
- ontimize
- marker-ws-ontimize-openapi-generator
- resources
- public
- restapi
- api
- Test.yml
- User.yml
- base
- AdvancedEntityResult.yml
- AdvancedQueryParameter.yml
- ColumnsParameter.yml
- DeleteParameter.yml
- DocumentIdentifier.yml
- EntityResult.yml
- ExportParameter.yml
- FileListParameter.yml
- FilterParameter.yml
- InsertParameter.yml
- MultipartFile.yml
- MultipartFiles.yml
- Number.yml
- Object.yml
- OFile.yml
- OFiles.yml
- Operator.yml
- QueryParameter.yml
- Responses.yml
- SQLOrder.yml
- String.yml
- UpdateFileParameter.yml
- UpdateParameter.yml
- Void.yml
- openapi-rest.yml
- api
- restapi
- public
- ontimize
- main
- pom.xml
- src
- projectwiki-ws
- src
- main
- java
- com
- ontimize
- projectwiki
- ws
- core
- rest
- MainRestController.java
- TestRestController.java
- UserRestController.java
- rest
- core
- ws
- projectwiki
- ontimize
- com
- java
- main
- pom.xml
- src
- .gitignore
- pom.xml
- README.md
- projectwiki-api
Testing
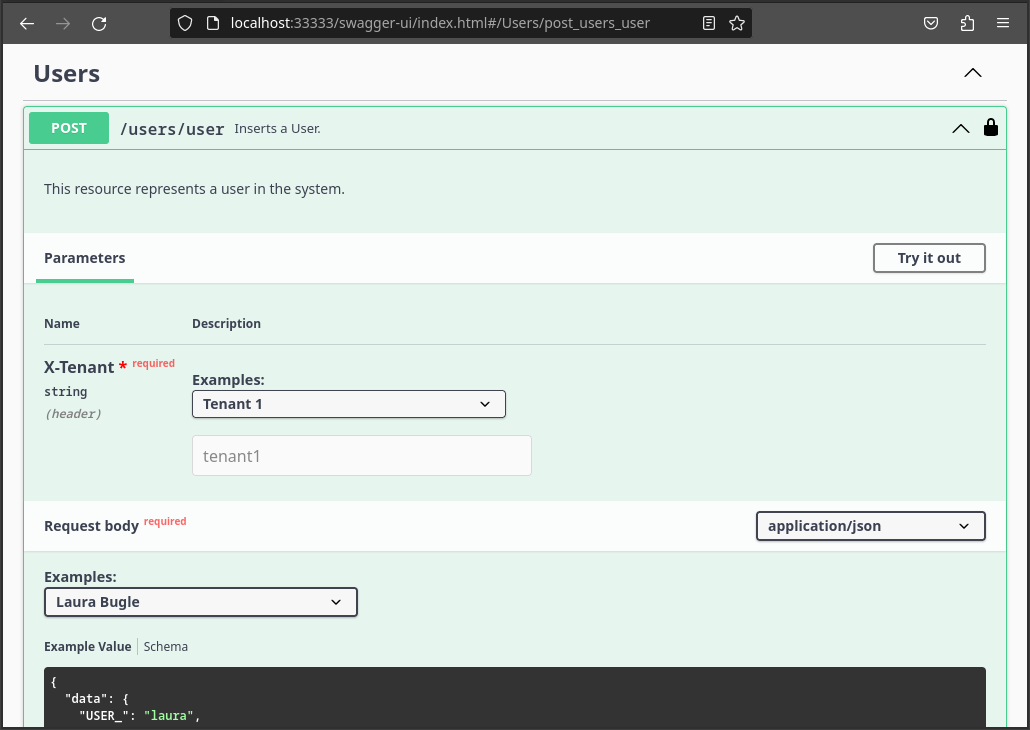
To test this functionality we will use the Swagger tool deployed with the application, but we must provide the tenant on the API requests. For this we need to add the X-Tenant parameter on the OpenAPI declaration files.
Modify the OpenAPI declaration files
In the openapi-rest.yml file we need to add a new parameter to provide the tenant and in the User.yml file we need to add a reference to this parameter on each method:
openapi-rest.yml
components:
  ...
  parameters:
    TenantId:
      in: header
      name: X-Tenant
      required: true
      schema:
        type: string
      examples:
        Tenant 1:
          value: tenant1
        Tenant 2:
          value: tenant2
      x-ignore: true
...
User.yml
default:
  post:
    ...
    parameters:
      - $ref: '../openapi-rest.yml#/components/parameters/TenantId'
  ...
  get:
    ...
    parameters:
      ...
      - $ref: '../openapi-rest.yml#/components/parameters/TenantId'
  ...
  put:
    ...
    parameters:
      - $ref: '../openapi-rest.yml#/components/parameters/TenantId'
  ...
  delete:
    ...
    parameters:
      - $ref: '../openapi-rest.yml#/components/parameters/TenantId'
...
search:
  post:
    ...
    parameters:
      - $ref: '../openapi-rest.yml#/components/parameters/TenantId'
...
login:
  post:
    ...
    parameters:
      - $ref: '../openapi-rest.yml#/components/parameters/TenantId'
...- ontimize-examples
- projectwiki-api
- src
- main
- java
- com
- ontimize
- projectwiki
- api
- core
- service
- IUserService.java
- service
- core
- api
- projectwiki
- ontimize
- com
- java
- main
- pom.xml
- src
- projectwiki-boot
- src
- main
- java
- com
- ontimize
- projectwiki
- ServerApplication.java
- projectwiki
- ontimize
- com
- resources
- public
- index.html
- application.yml
- public
- java
- main
- pom.xml
- src
- projectwiki-model
- src
- main
- db
- templateDB.txt
- templateDB_Main.txt
- java
- com
- ontimize
- projectwiki
- model
- core
- dao
- TenantDao.java
- UserDao.java
- UserRoleDao.java
- service
- UserService.java
- dao
- core
- model
- projectwiki
- ontimize
- com
- resources
- dao
- placeholders.properties
- TenantDao.xml
- UserDao.xml
- UserRoleDao.xml
- dao
- db
- main
- pom.xml
- src
- projectwiki-openapi
- src
- main
- ontimize
- marker-ws-ontimize-openapi-generator
- resources
- public
- restapi
- api
- Test.yml
- User.yml
- base
- AdvancedEntityResult.yml
- AdvancedQueryParameter.yml
- ColumnsParameter.yml
- DeleteParameter.yml
- DocumentIdentifier.yml
- EntityResult.yml
- ExportParameter.yml
- FileListParameter.yml
- FilterParameter.yml
- InsertParameter.yml
- MultipartFile.yml
- MultipartFiles.yml
- Number.yml
- Object.yml
- OFile.yml
- OFiles.yml
- Operator.yml
- QueryParameter.yml
- Responses.yml
- SQLOrder.yml
- String.yml
- UpdateFileParameter.yml
- UpdateParameter.yml
- Void.yml
- openapi-rest.yml
- api
- restapi
- public
- ontimize
- main
- pom.xml
- src
- projectwiki-ws
- src
- main
- java
- com
- ontimize
- projectwiki
- ws
- core
- rest
- MainRestController.java
- TestRestController.java
- UserRestController.java
- rest
- core
- ws
- projectwiki
- ontimize
- com
- java
- main
- pom.xml
- src
- .gitignore
- pom.xml
- README.md
- projectwiki-api
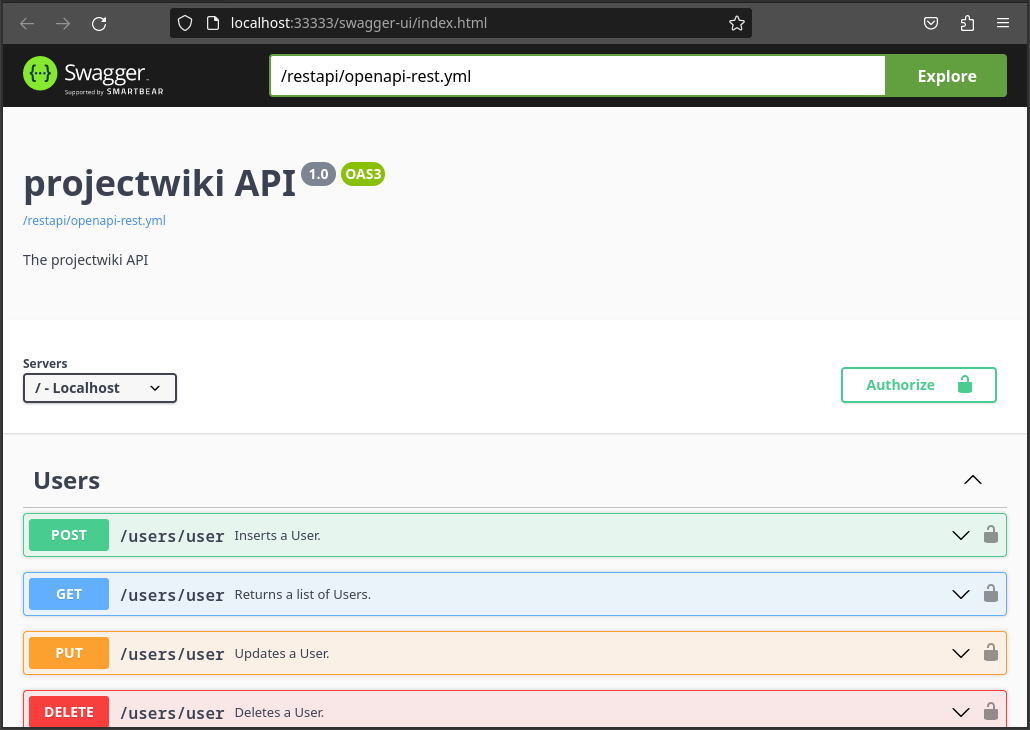
Once we have built and launched the project, we can access to the application by opening a web browser and navigating to http://localhost:33333):
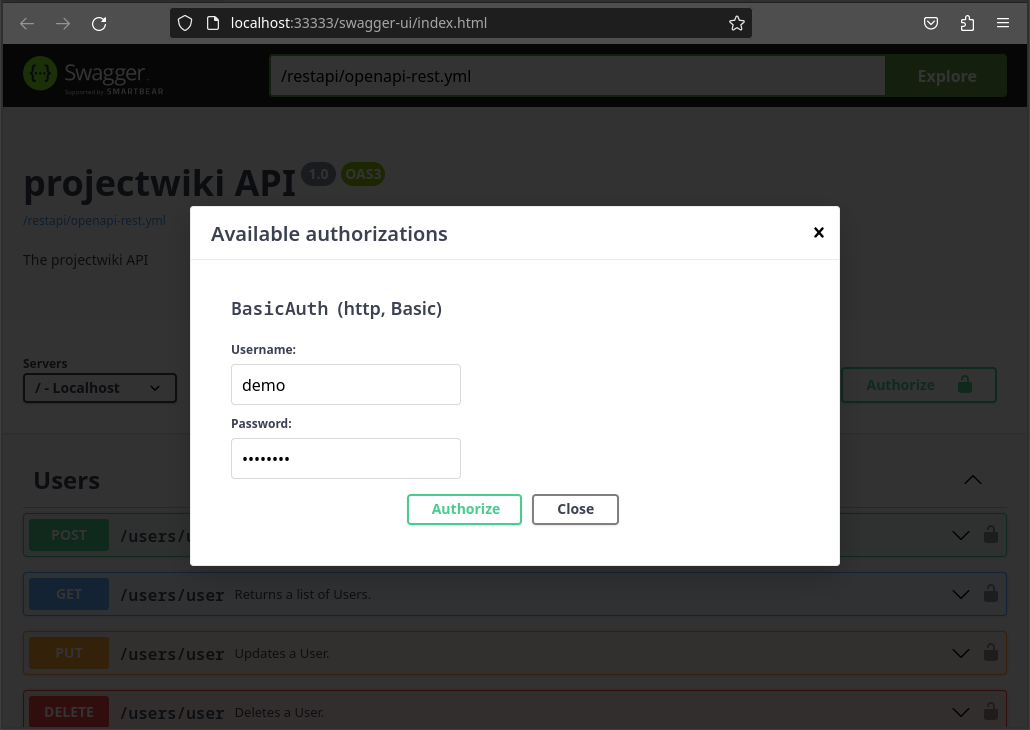
We must open the authorization dialog by clicking on the Authorize button, provide the credentials and click on the Authorize button.
Now, we can close the authorization dialog and test the API by providing the dessired tenant using the new parameter.