Multitenant System using the application properties
Introduction
Ontimize allows you to provide the tenants in the application properties. This is useful when the application will manage a fixed list of tenants.
Prerequisites
There are 2 options to follow this tutorial, clone the repository with the initial state and follow the tutorial step by step, or download the final example and see which files are new and which have been updated.
Initial project
/$ git clone https://github.com/ontimize/ontimize-examples
/ontimize-examples$ cd ontimize-examples
/ontimize-examples$ git checkout boot-multitenant-by-properties-initial
Final example
/$ git clone https://github.com/ontimize/ontimize-examples
/ontimize-examples$ cd ontimize-examples
/ontimize-examples$ git checkout boot-multitenant-by-properties
To simplify the code being written, three dots (…) may appear in some parts of the code. This indicates that there may be previous code before and after those dots.
Steps
We will use the existing database for the first tenant and add a new second database for the second tenant.
Deploy a second database
In the pom.xml of the model module, we need to add the configuration to enable the deployment of a second database:
pom.xml
...
  <profiles>
    ...
    <profile>
      <id>run_database</id>
      ...
      <build>
        <plugins>
          ...
          <plugin>
            <groupId>org.apache.maven.plugins</groupId>
            <artifactId>maven-antrun-plugin</artifactId>
            ...
            <executions>
              <execution>
                <id>configure_database</id>
                ...
                <configuration>
                  <target>
                    ...
                    <copy tofile="${hsqldatabase.path}/templateDB1.script" file="${hsqldatabase.path}/templateDB.txt" />
                  </target>
                </configuration>
              </execution>
            </executions>
          </plugin>
          <plugin>
            <groupId>org.codehaus.mojo</groupId>
            <artifactId>exec-maven-plugin</artifactId>
            ...
            <configuration>
              ...
              <arguments>
                ...
                <argument>-database.1</argument>
                <argument>${hsqldatabase.path}/templateDB1</argument>
                <argument>-dbname.1</argument>
                <argument>templateDB1</argument>
              </arguments>
            </configuration>
          </plugin>
        </plugins>
      </build>
    </profile>
    ...
  </profiles>
...- ontimize-examples
- projectwiki-api
- src
- main
- java
- com
- ontimize
- projectwiki
- api
- core
- service
- IUserService.java
- service
- core
- api
- projectwiki
- ontimize
- com
- java
- main
- pom.xml
- src
- projectwiki-boot
- src
- main
- java
- com
- ontimize
- projectwiki
- ServerApplication.java
- projectwiki
- ontimize
- com
- resources
- public
- index.html
- application.yml
- public
- java
- main
- pom.xml
- src
- projectwiki-model
- src
- main
- db
- templateDB.txt
- java
- com
- ontimize
- projectwiki
- model
- core
- dao
- UserDao.java
- UserRoleDao.java
- service
- UserService.java
- dao
- core
- model
- projectwiki
- ontimize
- com
- resources
- dao
- placeholders.properties
- UserDao.xml
- UserRoleDao.xml
- dao
- db
- main
- pom.xml
- src
- projectwiki-openapi
- src
- main
- ontimize
- marker-ws-ontimize-openapi-generator
- resources
- public
- restapi
- api
- Test.yml
- User.yml
- base
- AdvancedEntityResult.yml
- AdvancedQueryParameter.yml
- ColumnsParameter.yml
- DeleteParameter.yml
- DocumentIdentifier.yml
- EntityResult.yml
- ExportParameter.yml
- FileListParameter.yml
- FilterParameter.yml
- InsertParameter.yml
- MultipartFile.yml
- MultipartFiles.yml
- Number.yml
- Object.yml
- OFile.yml
- OFiles.yml
- Operator.yml
- QueryParameter.yml
- Responses.yml
- SQLOrder.yml
- String.yml
- UpdateFileParameter.yml
- UpdateParameter.yml
- Void.yml
- openapi-rest.yml
- api
- restapi
- public
- ontimize
- main
- pom.xml
- src
- projectwiki-ws
- src
- main
- java
- com
- ontimize
- projectwiki
- ws
- core
- rest
- MainRestController.java
- TestRestController.java
- UserRestController.java
- rest
- core
- ws
- projectwiki
- ontimize
- com
- java
- main
- pom.xml
- src
- .gitignore
- pom.xml
- README.md
- projectwiki-api
Enable the multitenant system
In the application.yml we need to disable the current datasource, enable the multitenant system and add the settings for each tenant (More information in this link):
application.yml
ontimize:
   ...
   jdbc:
      datasource:
         enabled: false
   ...
   multitenant:
      enabled: true
      configuration:
         tenants:
            tenant1:
               driver-class: org.hsqldb.jdbcDriver
               jdbc-url: jdbc:hsqldb:hsql://localhost:9013/templateDB
               username: SA
               password:
            tenant2:
               driver-class: org.hsqldb.jdbcDriver
               jdbc-url: jdbc:hsqldb:hsql://localhost:9013/templateDB1
               username: SA
               password:
...
spring:
   ...
#   datasource:
#      driver-class-name: org.hsqldb.jdbcDriver
#      jdbc-url: jdbc:hsqldb:hsql://localhost:9013/templateDB
#      username: SA
#      password:
#      initial-size: 10
#      test-on-borrow: true
...- ontimize-examples
- projectwiki-api
- src
- main
- java
- com
- ontimize
- projectwiki
- api
- core
- service
- IUserService.java
- service
- core
- api
- projectwiki
- ontimize
- com
- java
- main
- pom.xml
- src
- projectwiki-boot
- src
- main
- java
- com
- ontimize
- projectwiki
- ServerApplication.java
- projectwiki
- ontimize
- com
- resources
- public
- index.html
- application.yml
- public
- java
- main
- pom.xml
- src
- projectwiki-model
- src
- main
- db
- templateDB.txt
- java
- com
- ontimize
- projectwiki
- model
- core
- dao
- UserDao.java
- UserRoleDao.java
- service
- UserService.java
- dao
- core
- model
- projectwiki
- ontimize
- com
- resources
- dao
- placeholders.properties
- UserDao.xml
- UserRoleDao.xml
- dao
- db
- main
- pom.xml
- src
- projectwiki-openapi
- src
- main
- ontimize
- marker-ws-ontimize-openapi-generator
- resources
- public
- restapi
- api
- Test.yml
- User.yml
- base
- AdvancedEntityResult.yml
- AdvancedQueryParameter.yml
- ColumnsParameter.yml
- DeleteParameter.yml
- DocumentIdentifier.yml
- EntityResult.yml
- ExportParameter.yml
- FileListParameter.yml
- FilterParameter.yml
- InsertParameter.yml
- MultipartFile.yml
- MultipartFiles.yml
- Number.yml
- Object.yml
- OFile.yml
- OFiles.yml
- Operator.yml
- QueryParameter.yml
- Responses.yml
- SQLOrder.yml
- String.yml
- UpdateFileParameter.yml
- UpdateParameter.yml
- Void.yml
- openapi-rest.yml
- api
- restapi
- public
- ontimize
- main
- pom.xml
- src
- projectwiki-ws
- src
- main
- java
- com
- ontimize
- projectwiki
- ws
- core
- rest
- MainRestController.java
- TestRestController.java
- UserRestController.java
- rest
- core
- ws
- projectwiki
- ontimize
- com
- java
- main
- pom.xml
- src
- .gitignore
- pom.xml
- README.md
- projectwiki-api
Update the data access objects
The multitenant system provides its own datasource and the DAOs must use it, so we need set the datasource property to tenantDatasource.
UserDao.xml and RoleDao.xml
<?xml version="1.0" encoding="UTF-8"?>
<JdbcEntitySetup
    ...
    datasource="tenantDataSource"
...- ontimize-examples
- projectwiki-api
- src
- main
- java
- com
- ontimize
- projectwiki
- api
- core
- service
- IUserService.java
- service
- core
- api
- projectwiki
- ontimize
- com
- java
- main
- pom.xml
- src
- projectwiki-boot
- src
- main
- java
- com
- ontimize
- projectwiki
- ServerApplication.java
- projectwiki
- ontimize
- com
- resources
- public
- index.html
- application.yml
- public
- java
- main
- pom.xml
- src
- projectwiki-model
- src
- main
- db
- templateDB.txt
- java
- com
- ontimize
- projectwiki
- model
- core
- dao
- UserDao.java
- UserRoleDao.java
- service
- UserService.java
- dao
- core
- model
- projectwiki
- ontimize
- com
- resources
- dao
- placeholders.properties
- UserDao.xml
- UserRoleDao.xml
- dao
- db
- main
- pom.xml
- src
- projectwiki-openapi
- src
- main
- ontimize
- marker-ws-ontimize-openapi-generator
- resources
- public
- restapi
- api
- Test.yml
- User.yml
- base
- AdvancedEntityResult.yml
- AdvancedQueryParameter.yml
- ColumnsParameter.yml
- DeleteParameter.yml
- DocumentIdentifier.yml
- EntityResult.yml
- ExportParameter.yml
- FileListParameter.yml
- FilterParameter.yml
- InsertParameter.yml
- MultipartFile.yml
- MultipartFiles.yml
- Number.yml
- Object.yml
- OFile.yml
- OFiles.yml
- Operator.yml
- QueryParameter.yml
- Responses.yml
- SQLOrder.yml
- String.yml
- UpdateFileParameter.yml
- UpdateParameter.yml
- Void.yml
- openapi-rest.yml
- api
- restapi
- public
- ontimize
- main
- pom.xml
- src
- projectwiki-ws
- src
- main
- java
- com
- ontimize
- projectwiki
- ws
- core
- rest
- MainRestController.java
- TestRestController.java
- UserRestController.java
- rest
- core
- ws
- projectwiki
- ontimize
- com
- java
- main
- pom.xml
- src
- .gitignore
- pom.xml
- README.md
- projectwiki-api
Testing
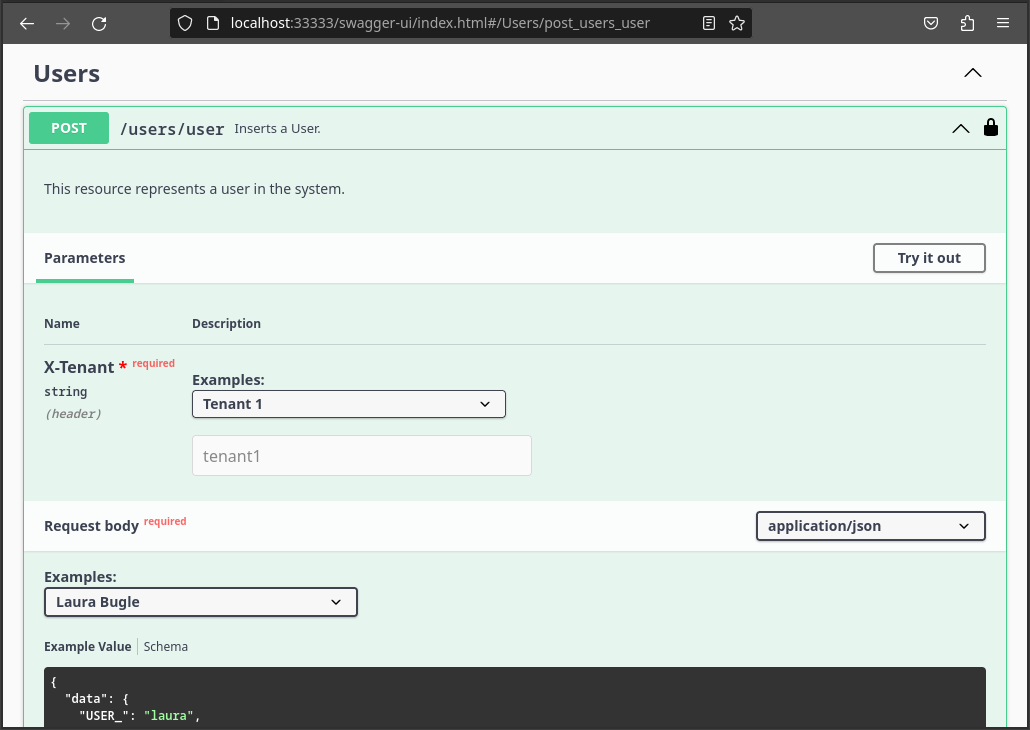
To test this functionality we will use the Swagger tool deployed with the application, but we must provide the tenant on the API requests. For this we need to add the X-Tenant parameter on the OpenAPI declaration files.
Modify the OpenAPI declaration files
In the openapi-rest.yml file we need to add a new parameter to provide the tenant and in the User.yml file we need to add a reference to this parameter on each method:
openapi-rest.yml
components:
  ...
  parameters:
    TenantId:
      in: header
      name: X-Tenant
      required: true
      schema:
        type: string
      examples:
        Tenant 1:
          value: tenant1
        Tenant 2:
          value: tenant2
      x-ignore: true
...
User.yml
default:
  post:
    ...
    parameters:
      - $ref: '../openapi-rest.yml#/components/parameters/TenantId'
  ...
  get:
    ...
    parameters:
      ...
      - $ref: '../openapi-rest.yml#/components/parameters/TenantId'
  ...
  put:
    ...
    parameters:
      - $ref: '../openapi-rest.yml#/components/parameters/TenantId'
  ...
  delete:
    ...
    parameters:
      - $ref: '../openapi-rest.yml#/components/parameters/TenantId'
...
search:
  post:
    ...
    parameters:
      - $ref: '../openapi-rest.yml#/components/parameters/TenantId'
...
login:
  post:
    ...
    parameters:
      - $ref: '../openapi-rest.yml#/components/parameters/TenantId'
...- ontimize-examples
- projectwiki-api
- src
- main
- java
- com
- ontimize
- projectwiki
- api
- core
- service
- IUserService.java
- service
- core
- api
- projectwiki
- ontimize
- com
- java
- main
- pom.xml
- src
- projectwiki-boot
- src
- main
- java
- com
- ontimize
- projectwiki
- ServerApplication.java
- projectwiki
- ontimize
- com
- resources
- public
- index.html
- application.yml
- public
- java
- main
- pom.xml
- src
- projectwiki-model
- src
- main
- db
- templateDB.txt
- java
- com
- ontimize
- projectwiki
- model
- core
- dao
- UserDao.java
- UserRoleDao.java
- service
- UserService.java
- dao
- core
- model
- projectwiki
- ontimize
- com
- resources
- dao
- placeholders.properties
- UserDao.xml
- UserRoleDao.xml
- dao
- db
- main
- pom.xml
- src
- projectwiki-openapi
- src
- main
- ontimize
- marker-ws-ontimize-openapi-generator
- resources
- public
- restapi
- api
- Test.yml
- User.yml
- base
- AdvancedEntityResult.yml
- AdvancedQueryParameter.yml
- ColumnsParameter.yml
- DeleteParameter.yml
- DocumentIdentifier.yml
- EntityResult.yml
- ExportParameter.yml
- FileListParameter.yml
- FilterParameter.yml
- InsertParameter.yml
- MultipartFile.yml
- MultipartFiles.yml
- Number.yml
- Object.yml
- OFile.yml
- OFiles.yml
- Operator.yml
- QueryParameter.yml
- Responses.yml
- SQLOrder.yml
- String.yml
- UpdateFileParameter.yml
- UpdateParameter.yml
- Void.yml
- openapi-rest.yml
- api
- restapi
- public
- ontimize
- main
- pom.xml
- src
- projectwiki-ws
- src
- main
- java
- com
- ontimize
- projectwiki
- ws
- core
- rest
- MainRestController.java
- TestRestController.java
- UserRestController.java
- rest
- core
- ws
- projectwiki
- ontimize
- com
- java
- main
- pom.xml
- src
- .gitignore
- pom.xml
- README.md
- projectwiki-api
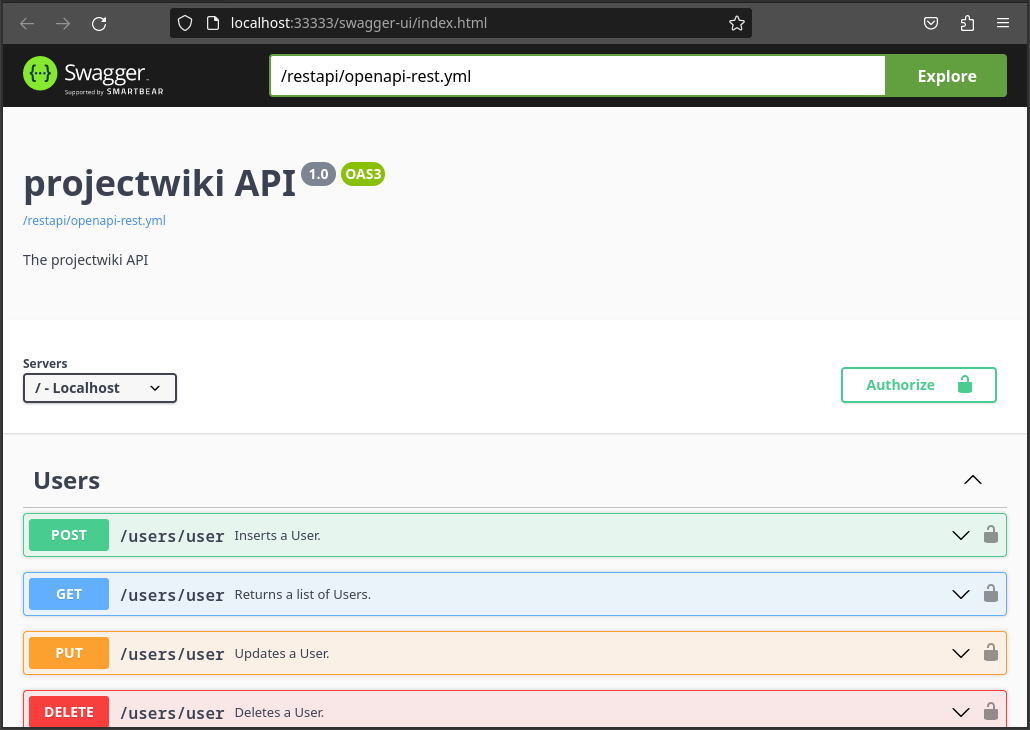
Once we have built and launched the project, we can access to the application by opening a web browser and navigating to http://localhost:33333):
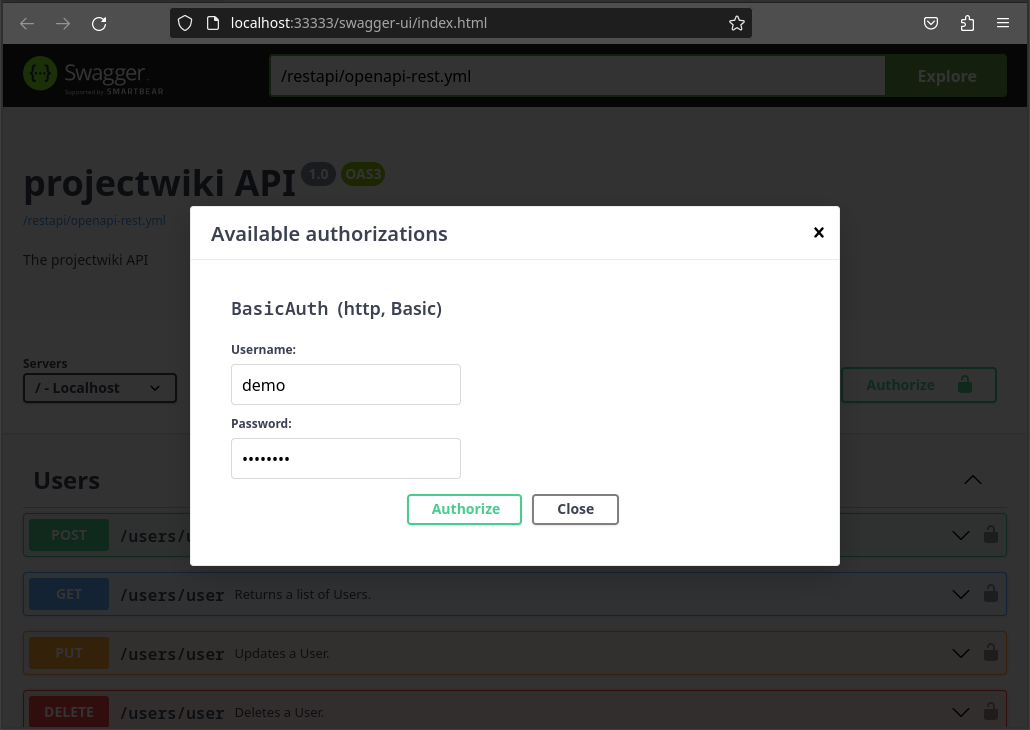
We must open the authorization dialog by clicking on the Authorize button, provide the credentials and click on the Authorize button.
Now, we can close the authorization dialog and test the API by providing the dessired tenant using the new parameter.